
Under the heading Roco 141 + 6090 I described how to equip an electric multi purpose locomotive of the series 141 with a 6090 decoder from Maerklin. Next is the freight locomotive of the series 140, also from Roco. Since there is a new decoder 60902, it was necessary to test if the decoder is capable to run a 5-pole Roco motor without jerking. That is by no means obvious, because when attempting to run a 3722 (E94) from Maerklin with this decoder, the behavior is not adequate. The internal power regulation, supposedly preventing an early death due to overload, can get activated if used with the LCFM, because this unit requires more power than a DCM (see power consumption). Some of the Roco motors from older series are known to use more power.
The installation is the same as with the BR 141: the analog parts, such as the module for the running direction needs to be removed and the middle part of the circuit board must be cut out. The 60902 is somewhat smaller, so that I did not remove it from its protective envelope. I glued it directly onto the motor (blue arrow).Then the connections need to be made. The brown wire was connected to the ground on the two suspensions and the red wire via a choke coil to the pick up shoe. To ensure good contact, I equip my locomotives with two pick up shoes, with electric locomotives I also use the pantograph. To improve the connections to the pantographs I screw solder connections underneath them (red arrows). To one of the screws holding down the circuit board I added a soldering strip (orange arrow) and soldered the orange wire to it. This is important for flicker free lighting. It is critical that there is no connection between the aluminum frame and the ground (brown wire). I am not able to tell what would occur if the frame were to touch the rails during a derailment, but it certainly wouldnt do much good. The decoder should be short-proof, so theoretically nothing should happen.
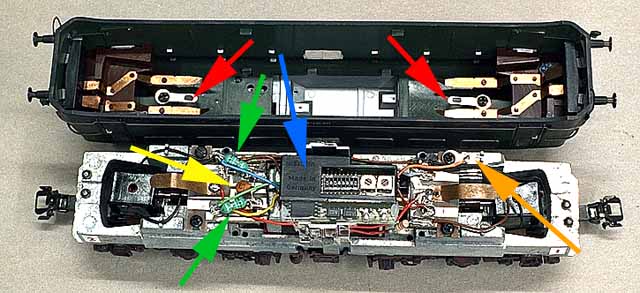
Before I connect the blue and green motor wires to the motor, I checked that the motor connections did not make contact with the frame and, indeed, they did touch. With a 6090 decoder this would have destroyed the decoder immediately. The 60902 is short-proof but the locomotive would not have operated like this. The springs of the board did touch the frame down below and not as suspected on the sides. With two pieces of electric tape this nuisance was quickly corrected. The two choke coils were soldered to the top of the contact area (green arrows) and the blue and green wires were soldered to them. The capacitor for noise suppression (yellow arrow) was left in place.
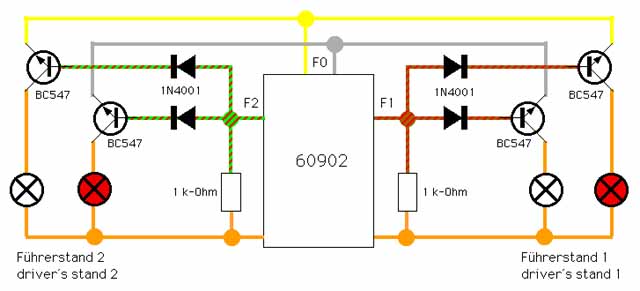
Even though the BR 140 is a freight locomotive, it is frequently used to run shuttle trains with 4-5 Silberlinge. For this reason this locomotive should be equipped with the right lighting for shuttle trains, as I had done with the BR 221 + 60902 and the BR 216 + 60902. The problems are the light bulbs of the Roco locomotives. They do not have return lead that is separate from the frame, as Maerklin does. For this reason I expanded my small additional electronic construction by 2 NPN transistors. The vour diodes are not necessarily needed. They prevent that some bulbs were glowing, if both extra funtions are on. But the combination makes no sense. Only on one loco side were all lights switched off, or f0 is off at daytime.
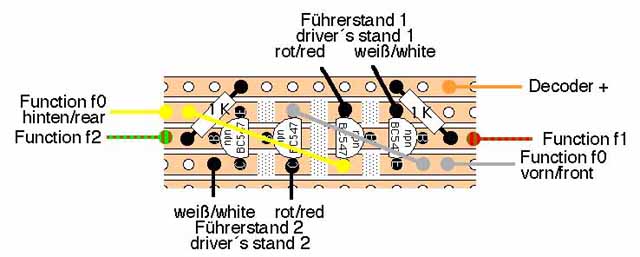
Because of the use of 4 instead of just two transistors, the circuit board becomes quite large. Unfortunately too large for the small space inside a Roco locomotive. What to do? First I connected the gray wire to the white front bulb and the yellow one to the rear. The red-brown wire f1 I connected to the red bulb of driver station 1 and the green-brown with the taillight of driver station 2. Digital operators, using only an Intellibox or a Control Unit will have problems. The changeover of the white lights works as usual, but the inclusion of the taillights during shuttle train operation is very difficult to describe. Users of computer controlled set-ups who write their own software have fewer problems. I change my program so that it reacts like the electronics in the locomotive. Since I use the computer to tell the locomotives on which side the train is connected, the computer knows exactly which lights are to be used. If a train is pulled, f0 is on and f1 and f2 are off. If a shuttle train is pushed and driver station 1 points to the train, then f0 is off and f2 is on. Sounds simple? It really is, if one writes ones own software. Else there is always the possibility to create extra room for the electronics inside the locomotive with a milling machine.
Last, but most importantly is the functional testing. Is the locomotive with the new 60902 running without jerking? It does and with laurels! All 27 running positions can be used and the locomotives runs slower when shunting than a Maerklin unit. The start up test with a heavy train on an incline works better than with a BR 141 with the old 6090. The new decoders are more powerful as I noticed with other re-builds. I try to set all my locomotives so they run at 100 km/h at position 10. Old Maerklin locomotives stand out quite unpleasantly, because they run much too fast. The worst example was an LCFM-103 with 60902 that was never slower than 123 km/h. I never thought that I would experience the opposite. The BR 140 managed only 80 km/h, even though I set the potentiometer for maximum speed. By setting the potentiometer for the minimum speed, one could have an ideal shunting locomotive. Since the motor has quite high Rpms even when running slowly, it can bridge small power interruptions easily. To adapt the locomotive to the behavior of my other engines, I set the delay quite high, so that the breaking delay from position 2 to 0 is as usual. There are no problem at the shadow station, but for double traction this locomotive is not suitable. This might change if Roco is selling a BR 140 with another serial number, maybe in a blue/beige color tone.

When I mounted the housing I did not pay attention to the correct position of the light bulbs. Thus the contact strip for the red light of driver station 2 touched the frame. When I activated f2 I wondered why it didnt work. A 6090 decoder would have been burned, but the 60902 survived this without problems. After I positioned the bulb correctly, all the lights worked properly. But for the top speed, which is too low, the BR 140 is a successful modification. Due to the slow transmission and the three power axles it is stronger than many Maerklin locomotives.
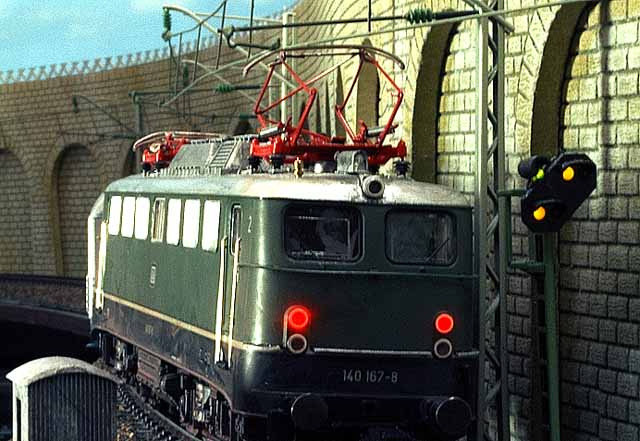
The prototype:
140 001 to 140879 (E 40 01 to E 40 689)
Model year 1957
Hourly output: 3700 kW / 5032 HP at 87.6 km/h
Top speed: 100 / 110 km/h
Weight: 83 metric tons
Length overall: 16490 mm
Axle sequence: Bo´Bo´
Driving wheel diameter: 1250 mm
The German Railways during the first program of new electrical locomotives acquired this freight locomotive, nearly identical to the E10.1 express locomotive. According to the anticipated use, the series E10 and E40 mainly differed in the transmission ratio (2.89:1 instead of 2.11:1) and the mechanical breaking system has smaller shoes. Numerous locomotives are equipped with snowplows. So the BR 140 could be used more freely, the German Railways increased the top speed from 100 km/h to 110 km/h in June 1969, without any changes to the engine and without concern regarding the engine Rpms. Thus these locomotives could be used easier for local traffic as well as express trains. During the construction period there were some modifications: From E40 163 the single lights were replaced by double lights, from 1960 the horizontal ventilation grids where modified to double jet ventilation grids with vertical bars. The locomotives of the first series were equipped with an electric equalizer for pulling power that later on was removed. All locomotives were originally delivered in green. 140 162 in 1975 was the first German railway engine painted in the new ocean blue-beige color. The series E40, with 879 purchased locomotives between 1957 and 1976 was the largest series of German locomotives. The most frequent use is in freight traffic on flat stretches. The BR 140 can also be found serving express and local traffic needs.