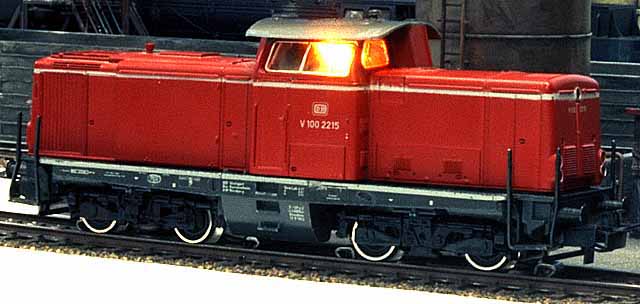
While rummaging around at a modeltrain dealer, I found a used 3072. Normally this is nothing exceptional, because Maerklin sells this locos since 1966. The special was, that the loco was in an old light blue box and had the number V100 2215. It was build in the years 1966-68 and is nearly a rarity. I asked the dealer, and he told me that it was a loco of a customer and it was always in a glass cupboard. A view to the pickup shoe certified this. It was old and rusty, but nearly unused. Gearbox and motor was full of old, dirty oil, so first I had to clean all. I removed the old oil with cleaning fuel. Next I greased the gearbox with Robbe teflon grease and the bearings with special oil WD-40. After assembling the gearbox it runs well. Last of all I fitted the HAMO stator 22 05 60 and connected a 6090 decoder.
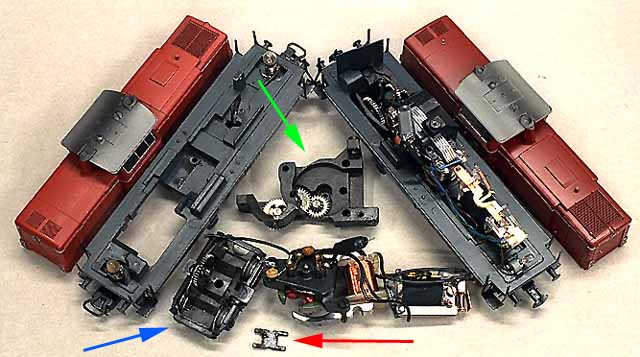
Newer models of the 212 (3072, on the photo right) have the drum commutator motor (DCM). The conversion to the regulated high-efficiency propulsion is quite easy. The stator can be changed without removing the hole motor (green arrow), wheel set (blue arrow) and cardan. This is a real progress. It was a fiddeling to fit the little plate of metal (red arrow), which works like a cardan, into the gearbox of my old V100.
The first drive test was as expected. The loco started moving with speedlevel 1 and the speed uphill and downhill was nearly the same. It was possible to adjust the speed, that speedlevel 10 is 100 km/h, only a difference of 20 km/h between backward and forward was strange. Other locos has also speed differences, but not so much. Now came the load test. Was the loco able to start moving uphill with a heavy train? Yes, but it needed speedlevel 4. I often noticed, that locos with old 6090 decoders had less power, especially locos with HAMO/LFCM.
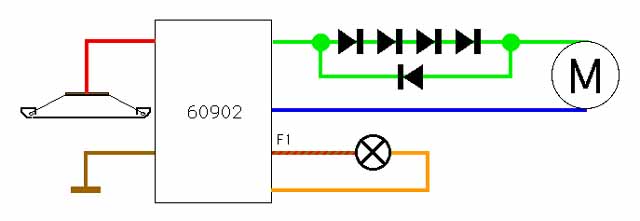
I removed the 6090 and connected a new 60902. Now the loco started moving uphill with a heavy train without problems, and the topspeed was not much higher then before. Still there was the speed difference between forward (86 km/h) and backward driving (118 km/h). I tried to reduce the speed in one direction with four diodes 1N4001 (see circuit) and it seemed to work, but now it had problems at shunting speeds. The loco started moving with a jump, was much too fast at speedlevel 1 and went jerky at mid speeds. This was a bad solution and I removed the diodes. Next I tried another rotor. It was the 20 58 00 which I had tested in my BR 103 + 60902. The results were worse. The loco drove jerky all the time, just like the regulation of the decoder was crazy. The speed difference was the same, but the direction had changed. There was no way, I had to remove the rotor again.
The higher speedlevels the speed differences were bigger. To use the loco meaningful, I choose a trick from the real world. The locomotives V100 has a gearbox with two gears, which can be only changed if the loco stands still. With the high gear the loco runs up to 100 km/h and is good for passenger trains. The low gear allows speeds up to 65 km/h and will be used for freight trains. I changed my computer program, that the loco will accept only speed commands up to 6, just like the freight gear is choosen. The speed difference forward 58 km/h to backward 66 km/h was tolerable. I use this procedure to set a speed limit to all my locomotives. My steam loco 80 runs only 40 km/h, the shunter 160 up to 50 km/h and the freight steamer 41 runs 90 km/h which is speedlevel 9.
I try to add a second pickup shoe to all my locos. It was no problem to glue the pickup shoe 20 63 70(red arrow). Because of that the body doesn´n clicked into place and at night was a light was to see(oranger Pfeil) between chassis and body at loco side 2.

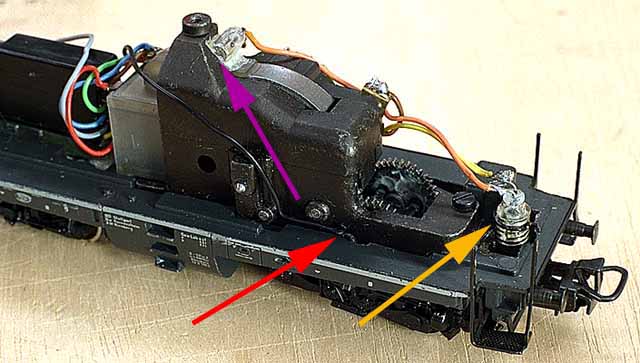
Because of the speed limit to 60 km/h, my V100 was only allowed to pull freight trains. This is the reason I does not installed red LEDs and electronic components to push shuttle trains. The bulbs of this loco has always a thread and were connected to the chassis. To make them flicker free, I want to use some capacitors, but there was less space inside the body. The only place would be above the open gearbox, but this seemed to be to dangerous. I choosed an unusual solution. I removed the old bulbs and glued newer bulbs 60 00 80 upside down into the old sockets(orange Pfeile). Normally this bulbs were used in train lights 7330 and shines too bright and hot in digital systems. Now the bulbs are in the old spiral-sockets and this works like a good heat conductor. It is impossible, that the plastic body can be demaged by the heat. To have a flicker-free light, the orange wire must be used. While putting on the body, I had some problems with the left coil. The right coil can be solded directly onto the motor shield (blue arrow) and I glued the other coil onto the stator (green arrow). After that, the body clicked right into place.
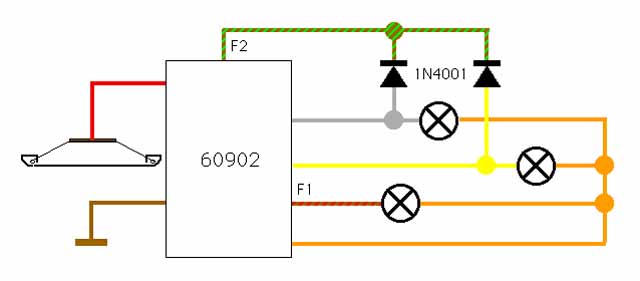
The 60902 decoder has the switchable function f0 and two other function outputs. But for what should I use two functions in a locomotive, which has not much space inside? Even though the loco has no interior decoration in the driver´s stand, I decided to install a light there. I took a bulb 60 00 80 und glued it onto the top of the stator (purple arrow). I wired it with the brown-red and the orange wire. After putting on the body, I was able see, that the driver´s stand was well illuminated. For I long time I had no idea what to do with the function f2. One day I saw a shunting V90 in the station, and it had white lights on both sides . This is usual for shunting moves, because the loco change oft the direction. I connected the brown-green wire with two diodes 1N4001 with the two bulbs. If function f2 is switched on, white lights on both sides of the loco were to see. If f2 is off, the function f0 works as usual. Because this locos has no red backlights, I switch on the "shunting light" while driving in the turntable area.
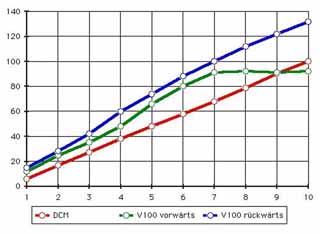
After a few days, the loco became faster. The big speed difference between backward and forward had not changed, but the speed at speedlevel 10 was now 130 km/h. After putting a 7558 magnet under the loco for switching reed contacs in the track, the driving quality became bad. The loco was jerking at the speedlevels 3 and 4. The accelerating line was not so straight like at a locos with DCM, but now it was horrible (shown at the graphic). Also the decoder became hot.
The magnet nearby the stator affected the magnetic field of the motor. After removing the magnet, the loco was less jerking, but the speed difference for/backwards was bigger. The magnetic field of the motor was so strong, that some reed contacts were be switched, but not all, so I need this magnet 7558. The smaller magnet 7557 was not strong enough, to switch the hidden reed contacts. Next I soldered a 10 ohm 5 watt resistor between the motor and the green wire. After that the loco drove well, but the resistor became very hot. The decoder had now a well temperature. The 5 watt resistor already had a big size, it would be impossible to fit a 10 watt resistor into the loco.
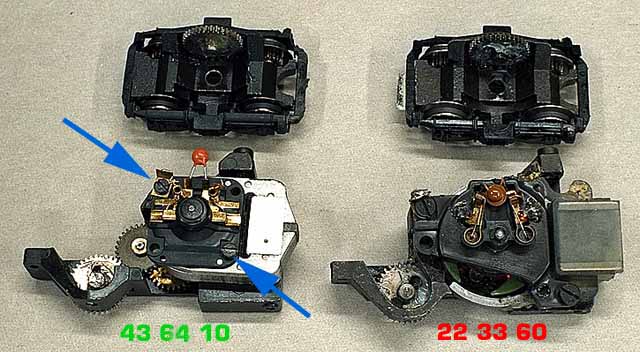
There was no well driving solution possible with the LFCM, so I decided to convert the motor to DCM. Fore that purpose the gearbox 22 33 60 must be changed against a newer one with the number 43 64 10. Two screws 78 51 40 were needed to fix the motor shield(blaue Pfeile). The stator, rotor, motor shield and coals came from the 60901 set. The driven wheels remained untouched, that reduces the costs. With the DCM it is possible to change stator and rotor while the motor can stay in the loco. The hole LFCM must be removed first. This is better for a quick servicing. Oddly enough was that the old srew for the motor under the loco and the old srew for the body at the roof were different. The newer ones have the numbers 75 50 20 and 75 60 10. The next test run showed the "technological superiority" of the DCM in connection with the 60902 decoder. The loco is now jerky free at slow speeds, the speed steps were right and the maximum speed was exactly 100 km/h at speedlevel 10. Although the DCM is smaller, but it has more power. I think the reason that the stator is made of many single sheet metals, in opposite of HAMO stators. Because that the magnetic field is bigger.
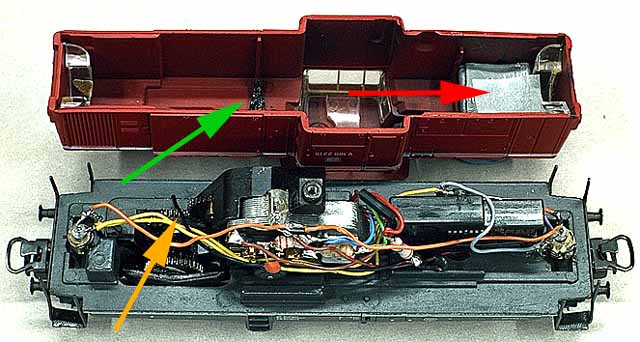
Now my only one V100 of the era 3 is full usable. With the shunting light and the interior light it is a cool model. The photo shows the final conversion. If the body will not click into place, may be the decoder is to high. I melt away a little plastic part in the body with my soldering iron(green arrow). Also this locomotive has a second pickup shoe. Shunting on turnouts is no problem. The wire from the pickup shoe to the decoder leads now across the open gearbox (orange arrow) to the other side of the motor. This loco has a unfavourable centre of gravity and the second pickup shoe relieves the driven wheels. This is problematic on crossings 2257. I took some lead into the short front part of the body(red arrow). This helps a little, but the loco can not pull heavy trains.
The prototype:
212 001 to 212 382 (V100 2001 to V100 2382)
Model year 1962
Hourly output:994 kW/1350 HP
Top speed: 100 km/h
Weight: 63 metric tons
Length overall: 12300 mm
Axle sequence: B´B´
Driving wheel diameter: 950 mm