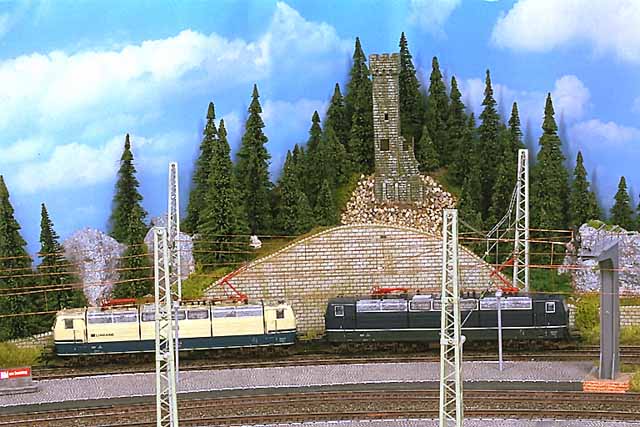
As early as child the 181 from Roco had fascinated me. I don´t know if it were the three windows at the side, which were extendet to the roof, or that this 2-system locomotive has always the same pantograph connected to the catenary (it is allowed to drive with the front pantograph on) on the german rails. Maybe it is the general impression of this locomotive. So it was no wonder, that I bought right away two of this loco types, as I saw them for a special low price at my dealer. It was the cobalt blue colored 181 209-8 (43985) and the blue and beige colored 181 211-4 (43984) with the name "Lorraine" on the side. To use them on my digital layout, I had to fit decoders.
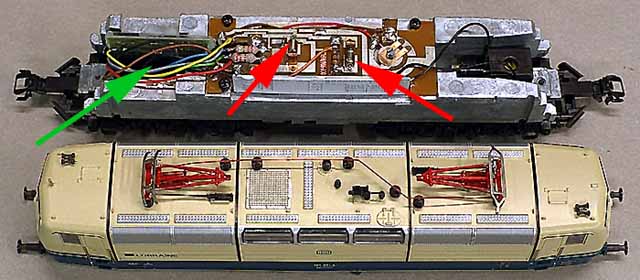
All my other locomotives from Roco have their bulbs in the driver´s stand. After removing a part of the electronic, it was always enough space to place the c90 decoder above the motor in the middle of the loco. This does not work with the 181, because it has the bulbs in the middle (red arrows). From this point leads some long, and crestfallen plastic light circuits to the ends of the loco. This is a big handicap. First the light looks not very bright and second some light rays change to the red light circuits and so it looks as always 5 lamps are on. On the other side, if the red lamps are on, the three white lamps were a little lighted.
Therefore it was not enough space for the normal c90 decoder. I looked for an alternative and found one in the E18 (37681). Inside is a smaller 60902 (60 38 58) without functions f1 and f2. It has only the normal function f0 to switch the light and the delay switch f4. It is nearly 50% smaller than the 60902. The main disadvantage is the higher price, and so I tried first to install the larger 60902. Above the wheels without gearbox is some space to fit the decoder up-end (green arrow), but the body of the loco doesn´t clicked into place. One could see a rift behind the three sidewindows above the engine imitation. In the daytime it doesn´t matter, but in the night was a bright light to see. Who doesn´t bother it, ok, but I want a better solution.
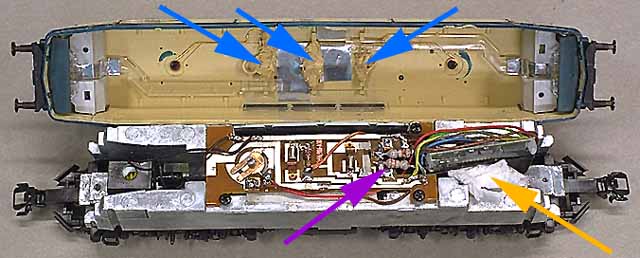
To have more space I had cut out the module plug of the Roco circuit layer and pushed the decoder into this new made hole. The big rift in chassis becomes a littler higher to the right, and the decoder do the same. I had installed the 60902 upside down, that the little step in the decoder body bother all. I melt away it with a soldering iron. While connecting the decoder to the loco, I soldered some wires to the top of the Roco circuit layer. Now there were some plastic parts under the roof of the locomotive body, which touched this wires. I melt away them with a soldering iron (blue arrows). The body fits better, but not all edges clicked into place.
The plastic light circuits of the red lights needed too much space above the decoder. I removed both, because the "cross lightning" looks pretty bad. I think it it better to have only three white lights on each side, as a mixture with red an white lights, which shines at the same time. Besides it is impossible to switch off the red lights separatly, like the 141 or 140, because the 181 has only two bulbs, but if a train is coupled, the red light must be off. Now the loco body fits, but it is clicking easier into place, if the decoder is pushed to the side with a pice of foam rubber (orange arrow). So it is more space for the white plastic light circuit.
Now comes the wiring. In the locomotive is no space for an extra function, so I cut off the brown-red, brown-green an purple wires at the decoder. I removed the coil and two diodes from the Roco circuit layer. It is important to check, that the circuits of the motor have no electrical contact to the metal chassis. The new 60902 has a overload protection, but at my first 181 I had done this mistake and the 6090 was damaged. I soldered two 3,9 uH coils to motor contacts (purple arrow) and connected them to the blue and green wire. The grey and the yellow wires must be soldered to the bulbs and the backwire ist the orange one. The bulbs shines very bright, but a 80 ohm resistor in the orange wire is the right way. The brown wire is connected to all wheels and the red one leads to the pickup shoe. I had finished with it.
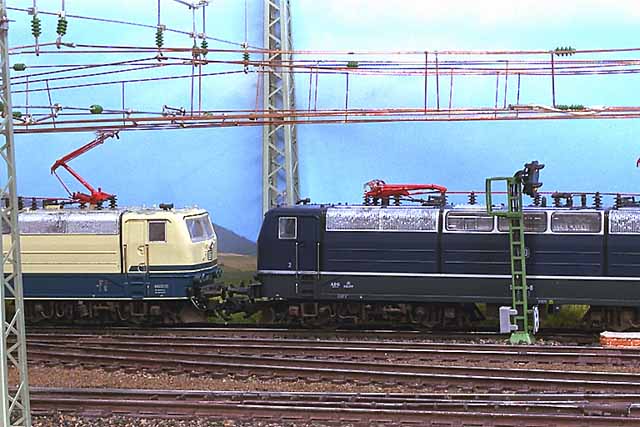
The first test run was very well. Both 181 can drive very slowly and caught the 100 km/h mark with speed level 10. My first 181 with old 6090 has less power to start a train uphill, because the regulation area is smaller. The blue and beige 181 can shunt very good, because the 60902 has 27 speedsteps.
Normaly I use the short coupler of Maerklin, but if one use the locomotives in double heading, the buffers will touch together, and the locos will derail. Therefore I use the Roco standard coupler. The bigger distance between the buffers doesn´t bother to me, because it is more important for me, that there are no drailings. The pantograph of the 181 is smaller than others (the german one, the french one is once more smaller), so one must be careful while building the catanary.
The prototype:
181 201 to 181 225
Model year 1974
Hourly output:: 3300 kW/4488 PS at 90 km/h
Top speed: 160 km/h
Weight: 82,5 t
Length overall: 17940 mm
Axle sequence: Bo´Bo´
Driving wheel diameter:1250 mm