Selfmade Interior Lights
To build interior lights into passenger cars, one buy a special light set for this car. it contains all what will be needed:
light circuits with bulbs
pickup shoe
ground contact
wires
These light sets are not cheap. It costs approx. 20 DM per passenger car and the results are often not so good. It is posssible to modify interior lights, but often the light circuits are to see from outside thru the windows, because it lays directly on the interior. This applies especially to older light sets. So I looked for a selfmade solution.

There are several solutions to distribute the light in a passenger car evenly. Normaly there are two bulbs and a plastic light circuit between. This works not properly, like shown with the Marklin light set 7330 in cars with compartments. To build such a plastic part selfmade is too difficult. Another solution is to solder some LEDs together. The results were poor. The light was small and yellow und its looks only pretty in old fashioned cars. The third solution uses more bulbs without plastic light circuit. Okay, it needs more electrical power, but I have a switchable interior light and only a few trains are iluminated at the same time. To distribute the light evenly, the bulbs have to stay high as possible under the roof. For brighter light it is good to have a high reflection. It is easy to glue white paper under the roof or to paint it white.
My first idea was to solder the Maerklin bulb sockets 60 41 80 on little layers. The benefit would be the quick change of the bulbs, but the costs of this relacement parts are too high. In the catalog of the electronic shop Voelkner I found some bulbs 014-057-322 for only 0,15 DM a piece (buying 100 bulbs). The bulb is build for 24 volts and this looks perfect for my digital system. It needs only 40 mA but its size is big (19 x 5 mm). The bulbs are too big to use them in locomotives, but under the roof of a passenger is enough space, because I use no plastic light circuit.
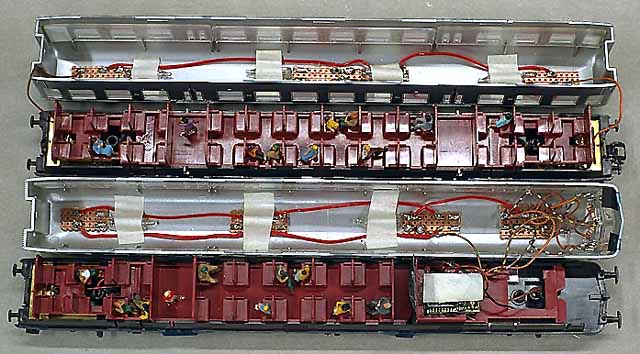
As shown at the photo I cut small layers and soldered the bulbs onto. After that I glued it under the roof and connected to the wires. To solder in the passenger cars looks difficult, but it is easy to change the bulbs. I planned to set 3 bulbs into this shuttle car, but it looks better with 4 bulbs. I changed it later. The bulbs became hot and it is not possible to touch them, but ist is not hot enough to smelt the roof. I paste a piece of adhesive tape which is permeable to light. With this I eleminate the light spot under the bulb.
To couple the 27 cm passenger cars together, I use the electric coupler 7391 from Maerklin. This fits not to cars from Roco or Fleischmann. First I tried electric coupler from this company, but they are very expensive. My aim it to make it cheap as possible, so I solder a wire from one car to the next.
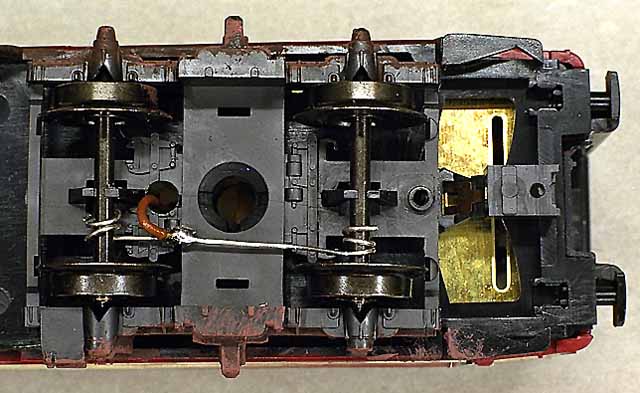
I installed the electronic parts into a baggage car or into a dining car. It contains a k73 decoder with two-coil-relay, a function decoder with one-coil-relay or a function decoder with two-coil-relay. The ground contacts to the wheels are selfmade. I took a 0,5 mm strong copper wire wire silver surface and wind it around the axles. The wheels must spin easy. Soon after I soldered a wire onto. This construction looks primitive, but it works very well.
A little more dificult was to fix a pickup shoe. There are special pickup shoes 41 81 00 for Maerklin passenger cars, but the price is double high as a normal pickup shoe. Often I use pickup shoes like 7164 and glued them between the wheels. For 3-axle passenger cars the pickup shoe 7175 is agood choice. For the distance a use a piece of wood.